
Beat Saber by default doesn’t allows you to add custom songs of your own choice into the game.
However, with Modded Beat Saber on Meta Quest 2, you can add some of the customizations which are not possible in vanilla.
For example, you can add your own custom songs.
And that’s precisely what we are going to do here, here in this article we are going to talk about getting custom songs on Beat saber Meta Quest 2.
Please do note dear reader:
Even tho in this guide, I mostly refer to your VR headset as Quest 2. This guide is intended and works for both Meta Quest and Meta Quest 2 (Previously known as Oculus Quest and Oculus Quest 2).
How to Get Custom songs in Beat Sager on Meta Quest 2
Since the vanilla game only offers you a limited number of tracks; To add any track of your choice, you need to mod your Beat Saber game.
However modding this game, just like any other game isn’t just simply enabling an option.
There is a process that you need to follow if you want to Mod Beat Saber on Meta Quest 2. If you haven’t checked already there is a way you can get Beat Saber for free on Meta Quest 2.
So to get everything right you have to do the following, step-by-step as mentioned in this article.
Step 1 – Turn on The Developer mode
The first step toward modding this or any other game on Quest VR is turning on the developer mode.
Do not discourage by its name, you don’t need to be a developer to use the developer mode.
You just need to possess a little bit of knowledge of how to tackle various different menus and options, which I am pretty sure you already have.
Here is what you need to do to Turn on the developer mode –
Register as Oculus Developer
The first step to Enable developer mode on meta Quest 2 is not actually toggling on the developer mode but actually registering as a developer on the oculus website.
Using any device, you can head over to Oculus Developer Website.
Make sure that you use the same account that you have set up on your VR headset.
Once registered you have to verify either by adding a credit card or setting up two-factor authentication.
Once verified create an organization. Name anything you want, accept the terms and submit.
Toggle On the Developer mode

Now once you are done with registering as a developer, you have to actually enable this option in using your phone.
For this step, you will need the Quest app which is available for Android and iOS on their respective app store.
Login in the Quest mobile app using the same account, Navigate to the menu and click on Devices.
Make sure that both the app and your Quest device are connected to the same WiFi.
Also, your Quest 2 devices status should be showing connected.
There, Just below the synced media under the headset setting you will notice an option that we need – “Developer mode”.
On the Developer mode screen, you have to toggle it on.
Step 2 – Install and Set up SideQuest
SideQuest is a must-have app for your Meta Quest Vr headset user.
This app allows you to sideload any app that is not available on the Quest store.
We will use this app to transfer files that are required for modding and later on add custom songs.
To install and set up SideQuestVr, you have to follow the following process –
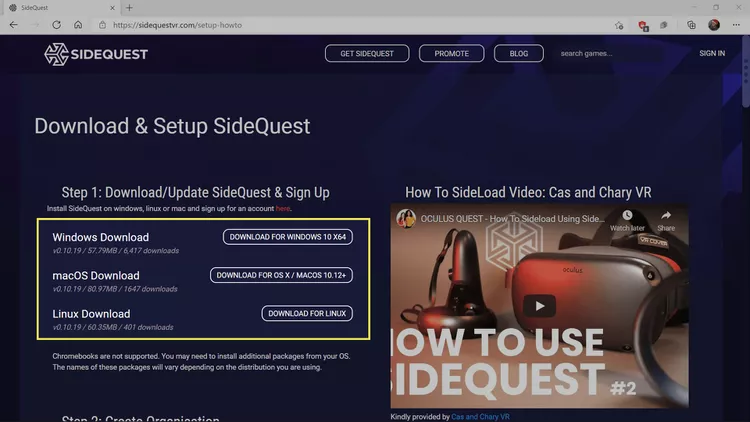
- Head Over to SideQuestVr.Com using your Desktop.
- From the menu click on get SideQuest.
- You will install it for Windows 10. Click on show more if you using another operating system like Mac or Linux.
- Download the installer, and proceed through installation on your computer.
Step 3 – Connect Meta Quest to SideQuest
Once installation is done, Open the software that you just have installed on your PC, grab a USB cable and Connect it to your PC and Quest 2 headset.
A USB Debugging message will pop up on the screen, Simply allow it and make sure you also tick “Always allow from this computer”.
Once it did congrats that you successfully setting up Side Quest on your computer and connecting to your Virtual reality headset.
Step 4 – Back up the original Beat Saber Game files
After Connecting both your VR and PC, make sure it keeps connected for the next step.
At this stage, it is a good idea to create a backup for your Beat Saber on PC.
Even tho, it’s not actually required it’s better to make sure you are ready if you want to switch to the original game.
if you choose to back up your Beat Saber Game files on Pc, You can follow these steps to do so –
- Here, first Open the SideQuest app on your Windows, Linux, or MAC computer if you haven’t already.
- On the top menu choose the folder icon.
- Now navigate to Android > Data. You will bunch of folder and disk icons for all the apps and games that you installed on your Meta Quest.
- Just click on the disk icon next to “com.beatgames.beatsaber” to back up Beat Saber game files.
- Popup windows will open asking you “Save selected files to your PC” and choose to save to PC.
Once Backup is done, We can start the actually modding to add your desired songs to this game.
Step 4 – Setup the BMBF app
BMBF which is available in the APK format is the most popular modding solution to mod Beat Saber on any Oculus Quest headset.
This application allows mods like custom songs and sabers.
Using SideQuest VR, which we have just installed in previous steps, We Can setup the BMBF app on your VR headset.
Downlaod BMBF Apk File
Here is what you need to do to Download, Install, and set up the BMBF app on your Meta Quest –
- First head over to the BMBF website using your computer where you Installed SideQuest VR.
- Scroll down and locate the latest stable version. You will see APK right under the Assets heading and the date will be right next to it.
- You’ll have to click on the app name to download that file.
Install and Setup BMBF App
Once the file is downloaded, You have to open the SideQuest app and on the main page choose the APK installation icon.
Using this option you can install the apk file that we just downloaded.
The Installation icon is just like any other download Icon (Which is down facing arrow icon).
Once the installation is done, you will notice the app icon. Click on the app icon and on the next screen you will see all the installed apps.
We have to click on the Gear/Setting icon just right next to BMBF app.
A bunch of options will appear on the new window, There click on the Launch app option.
Put your Headset back on
For the next part, you have to put your Meta Quest 2 Headset on.
Put your Headset on while making sure that it is still connected to your Computer via a USB cable.
Their select continue > uninstall> ok and then select Patch Beat saber > choose Install and accept the Install.
Step 5 – Sideload Songs using SyncSaber
At this stage, your game is modded.
However, since our goal is to load custom tracks we need to follow a few additional steps.
Register on Beast Saber
First head over to the website – https://bsaber.com/.
There from the menu option choose the Login option.
On the login screen, just below the Login form in the small text, you will notice the “Register” link.
Hit the register link and follow the sign-up process.
Check your mail for a confirmation email, follow the confirmation link and reset your password.
Note down both username and password, you will need them for the next step.
Login to the SyncSaber
Put your Quest headset again and open the BMBF app that we just have sideloaded using SideQuest.
There you have to select SyncSaber.
To proceed with using that, you have to log in using the account we just created in the previous set.
Just log in using the account credentials that you have noted down.
Sideload Custom tracks
Once you have logged in successfully you will be able to use any additional songs available on SyncSaber.
To Sideload, use or add any of these available tracks you just hit the download icon right next to it > choose beat saber and Select to allow if it asked for storage permission.
So in Conclusion
Getting and Adding custom songs to your Beat Saber on Meta Quest 2 is not a straightforward process but if you know what you are doing, you can easily do it.
You need your VR headset, USB cable, PC, SideQuest app, and BMBF app.
If you follow all the steps mentioned in this article correctly, you will mod your beat saber in no time and once that is done you can Get Custom Songs in Beat saber.
FAQs
Can you add custom songs to Beat Saber Oculus Quest?
Yes, you can add custom tracks to your game. However, unfortunately, this can be only done if you are playing solo and offline.
How Do I manually add custom songs?
SyncSaber is the most popular tool that you can use using the BMBF app. You have to allow developer mode and enable sideloading using the SideQuest app.
How to get custom songs on Beat Saber Oculus Quest 2 without a computer 2023?
You can use a Virtual PC for this task, Similar to playing Steam Game on Quest 2. However, it is recommended that you use a PC since the process would be much simpler and easier with it.
Can oculus ban you for custom Beat Saber songs?
If you are playing locally on your own, there would be no issue. It’s just that if you want to play Beat saber with friends, you will not able to use the multiplayer mode of this game.
How do you add custom songs to Beat Saber Meta Quest 2?
The short answer is – modding. Once you mod this game, you are free to sideload custom tracks and saber in this game.